You wish to use the LDAP Authentication method for NGFW VPN client or Browser-Based Authentication, or SMC LDAP linked administrator account authentication, and wish to use encrypted LDAPS between the Active Directory server, and SMC/NGFW.
Note This KB article covers setting up LDAP Authentication using LDAPS. The article does not cover configuring Browser-Based Authentication and VPN client features where LDAP authentication can be used to authenticate users to the firewall.
Creating a certificate for Active Directory
In order to use LDAPS for the communication between Active Directory (AD) and NGFW/SMC, the AD server must have a valid server certificate. Following steps describe one way of creating this certificate:
- In the AD server open Microsoft Management Console (MMC) > click File menu > click Add/Remove Snap-in...
- Add the Certificates snap-in for Local Computer:
- In the Add or Remove Snap-ins window select the Certificates snap-in and click the Add button.
- Select Computer account on the Certificate snap-in window and click Next.
- Keep Local Computer selected on Select Computer window and click Finish.
- Click OK to add the Certificates (Local Computer) snap-in to the MMC console.
- Expand Certificates (Local Computer) > right-click the Personal folder > select All Tasks > Request New Certificate...
- Click Next on the front page of the Certificate Enrollment wizard > select Active Directory Enrollment Policy on the Select Certificate Enrollment Policy page and click Next > select Domain Controller on the Request Certificates page, and click Enroll and Finish once the enrollment is done.
- Check that Personal > Certificates shows the new certificate with Server Authentication listed in the Intended Purposes column. Make note also of the Issued To value as that will be used in the AD server element configuration in SMC to match the certificate to the specific server.
Note For additional details and instructions, refer to Microsoft Active Directory documentation
Exporting the Active Directory Certificate Authority
In order for SMC and NGFW to trust the Active Directory server certificate, the Active Directory Certificate Authority (CA) needs to be exported so it can be added to SMC as a trusted Certificate Authority:
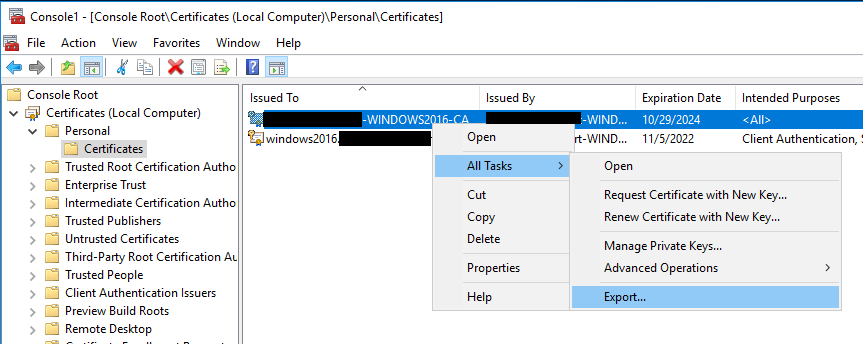
- In the MMC Certificates (Local Computer) console right-click the CA certificate > select All Tasks > Export.

- On the Certificate Export Wizard welcome page click Next.
- On the Export Private Key page select No, do not export the private key and click Next.
- On the Export File Format page select Base-64 encoded X.509 (.CER) and click Next.
- Define the file name and location where file will be saved on the File to Export page and click Next.
- On the Completing the Certificate Export Wizard page click Finish
- Copy the exported CA certificate file to a location where you can access it with the SMC Management Client.
Configuring the LDAP Authentication in SMC using LDAPS
Next we'll need to create the configuration in SMC. This includes adding a
Trusted Certificate Authority element for the Active Directory CA certificate, a
TLS Profile element used for accepting only the AD CA signed certificates, an
Active Directory Server element for the AD server, and a
LDAP Domain element for the external AD domain.
Adding Trusted Certificate Authority element
In SMC we'll first need to add a
Trusted Certificate Authority element for the Active Directory CA certificate.
- Navigate to Configuration > Administration > Certificates > Certificate Authorities > Trusted Certificate Authorities.
- Click New > Trusted Certificate Authority.
- Define a Name for the Trusted CA element on the General tab.
- On the Certificate tab click Import button, navigate to CA certificate file you exported from AD, and click Import.
- Click OK to save the trusted CA element.
Creating a TLS Profile element
Next we'll add a
TLS Profile element that NGFW will use to verify the certificate AD presents during the LDAPS connection TLS handshake is signed by the AD Certificate Authority.
- Navigate to Configuration > Administration > Certificates > Other Elements > TLS Profiles.
- Click New > TLS Profile.
- Define the settings for TLS Profile:
- Give a Name for TLS Profile element.
- Select TLS Cryptography Suite Set that defines supported algorithms. In this example setup we use built-in NIST (SP 800-52 Rev. 2) Compatible TLS Cryptographic Algorithms element.
- Change Trusted Certificate Authorities selection to Trust selected and add Trusted Certificate Authority element you created for AD Certificate Authority.
- For Version use TLS 1.2 unless there's requirement from AD side to use older TLS standard.
- Optionally enable also Check Revocation to have NGFW do certificate revocation checks.
- Click OK to save the element.
Creating an Active Directory Server element
An
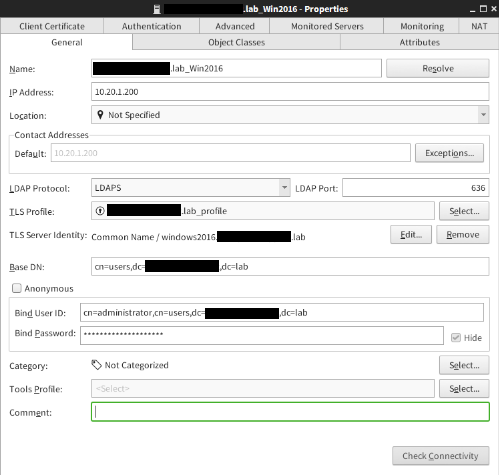
Active Directory Server element needs to be created in SMC as that will define the settings how SMC and NGFW communicates with Active Directory.
- Navigate to Configuration > User Authentication > Servers.
- Click New > Active Directory Server.
- Define the settings on the General tab:
- Give a Name for the element.
- Define the IP Address of the AD server.
- If any Management Server or any of the NGFW engines need to communicate with AD server through NAT, define Location and Contact Addresses.
- Select LDAPS as LDAP Protocol so communication will be TLS decrypted.
- Specify LDAP Port, which by default it 636 with LDAPS.
- From the TLS Profile drop-down menu select TLS Profile created in previous steps.
- TLS Server Identity needs to match the AD certificate. In this setup Common Name / windows2016.<redacted>.lab is used.
- Base DN defines the AD LDAP tree base container under which the users accounts are stored.
- Bind User ID and Bind Password specify the AD account that will be used when querying the AD tree for user and group information. The account selected must have permissions to manage other user accounts.

- The default settings defined on Object Classes and Attributes tabs should work with Active Directory. However, these settings need to be changed if related changes have been made on AD the side, e.g. the LDAP Attributes configuration needs to be changed if schema changes have been done on the Active Directory schema file.
- On the Authentication tab add LDAP Authentication to the External Authentication Methods box.
- Optionally define settings on the other tabs, and click OK to save the Active Directory Server element. More details about settings on the tabs can be read from the latest Forcepoint NGFW Online Help from the Create Active Directory Server elements page.
Adding a LDAP Domain for Active Directory
Lastly we'll need to create a
LDAP Domain element to allow administrators to browse the Active Directory LDAP tree in the Management Client.
- Navigate to Configuration > User Authentication > Users
- Click New > External LDAP Domain
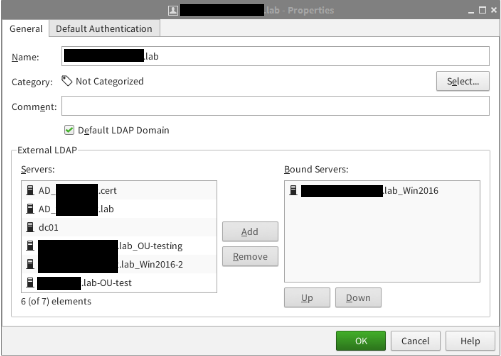
- Define the settings on the General tab
- Give a Name for the LDAP domain element. It is recommended to use a name that users can easily remember as it might need to be used during authentication as described below.
- Enable the Default LDAP Domain selection if desired. This setting defines which LDAP domain the NGFW engine queries by default thus allowing users to specify only their username during the authentication. With other LDAP domains not defined as Default LDAP Domain, users need to use the <username>@<ldap_domain_name> syntax. For this reason the name of the External LDAP Domain element should be carefully selected. For more details on username syntax, see the Using external authentication with Next Generation Firewall and Troubleshooting issues with NGFW external authentication articles.
- On the External LDAP section add the Active Directory Server element created on earlier steps to the Bound Servers list.

- On the Default Authentication tab select LDAP Authentication in the Authentication Method selection, and click OK to save the element.
Now that the LDAPS authentication has been configured for Active Directory, the LDAP Authentication method, and AD users and groups can be used in the Authentication cell of access rules. Here is an example rule:
Keywords: Next Generation Firewall; user authentication; LDAP authentication; LDAPS; Active Directory


